Installation guide of the SLM-OxC Web-GIS tool
- Fajr Fradi (Unlicensed)
The Web-GIS can be installed on local servers or on Amazon Web Services (AWS) linux instances. The installation procedures are the same on the local server and on AWS. Only the type of connection to the server is different and depends on the platform chosen by the user.
This is the Web-GIS Installation Guide for deployment on AWS Ubuntu instance.This guideline describes the complete installation procedures for the Web-GIS application. It supports the end user (typically the system administrator, the geodatabase administrator roles) to install, maintain and monitor the WebGIS application.
Prerequisites for a new installation of the Web-GIS application
The following procedures are intended for use with Amazon Web Services or Ubuntu Instance. It is assumed that the user has already launched an Amazon Web instance, has created a public DNS that is reachable from the internet. The security group(s) are configured to allow access through the Secured Shell (SSH) on the default port 22, HTTP is enabled on the default port 80, and HTTPS (port 443) connections are enabled.
System requirements
It ensures that your system meets the minimum requirements.
| Amazon Instance Server | Third-party Applications | Web Browsers |
|---|---|---|
|
|
|
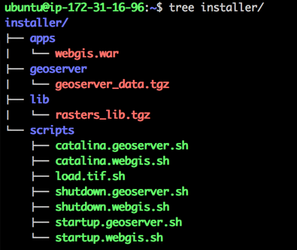
- You need to verify the distribution files. I don't see the link between these sentences. this goes to the preparation to verify that you have the intaller so before the connection.
The installer directory contains (normally/ must?) the following files:
- WebGIS application archive – webgis.war
- GeoServer extension libraries for Rasters and ImageMosaic – rasters_lib.tgz
- Tomcat scripts for GeoServer and WebGIS applications – scripts
- Geoserver Data with Sample Datasets – geoserver_data.tgz
Step 1: Connecting to your Amazon Linux Instance using SSH
We have two options : Amazon or local instance.
| Amazon instance | Local instance |
|---|---|
|
|


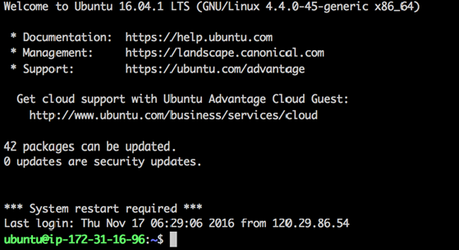
Once connected, you will have a message like the following figure shows. In this case, you can continue to the next step.
Step 2: Configuring the Java Platform
This step requires that you install the Oracle JDK 8 first. For that, you have to add Oracle's PPA first , then update your package repository.

Next, you have to install the latest stable version of Java at time of writing and the recommended version to install. You can do it using the following command:

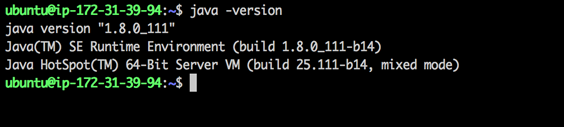
When the installation is done, check the version of Java again by typing “java –version” at the prompt and pressing Enter. You will have a similar message like the following figure shows. It also indicates the version of Java you just installed.
Step 3: Setting the JAVA_HOME environment variable
To set this environment variable, you need first to find out where Java is installed. You can do this by executing this command:
You copy the path from your preferred installation and then you open /etc/environment using vi or your favorite text editor.

At the end of this file, you add the following line. You make sure to replace the highlighted path with your own copied path.


Step 4: Configuring the Database Server
The following figure describes how to install PostgreSQL 9.5, PostGIS 2.2, pgRouting on Ubuntu version 16.04. You have to check what version of Ubuntu you are running

The output should be as the following figure shows:
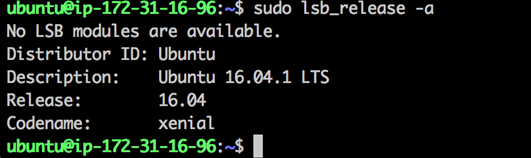
For Ubuntu release 16.04, the codename is “xenial”. You add Respository to sources.list. You'll need to replace the codename below with what you are running.

You add Keys.

Step 5: Installing PostgresSQL and PostGIS
The following command will allow you to install postgresql 9.5, PostGIS 2.2, pg Routing 2.1 and additional supplied modules including the adminpack extension:

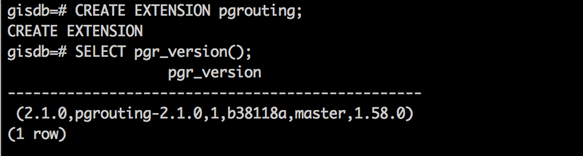
You install pg Routing 2.1 package

You enable adminpack: While in terminal, you log in to the psql console as postgres user:

Step 6: Creating a database and enable PostGIS extension and GDAL drivers
The following command will allow you to enable PostGS and GDAL

The output should be as the following figure shows:

You enable pgRouting extension.

The output should be like the following figue shows:
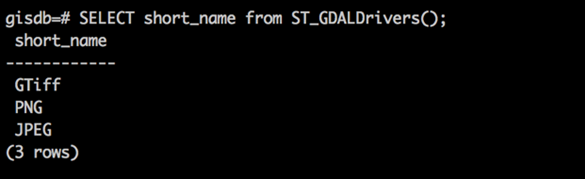
You enable GDAL Drivers to GTiff, PNG, JPEG.

The output should be like the following figure shows:
Then, you exit psql console:

Step 7: Changing PostgreSQL password
While in terminal, you log in to the psql console as postgres user:

For this setup, the postgres user password is set to: “adm-aws001”.
Then, you exit psql console:
Step 8: Creating and using a .pgpass file
A .pgpass file will allow you to use postgres CLI tools such as psql and pg_dump without having to manually enter a password. To create the .pgpass file,you execute the command below.
To use postgres command line, you can use either "-w" or "--no-password". It will never issue a password prompt.
Step 9: Setting up PostgresSQL for remote connection (optional)
Following the steps below, you will be able to enable remote access to PostgreSQL database server. First, relevant IP addresses of remote machines that are supposed to have access to the database need to be added to the pg_hba.conf configuration. You may need to edit pg_hba.conf and postgresql.conf to allow external access.

At the end of the file, you add the following line and save your changes.
P.S: you replace “0.0.0.0/0” with the relevant IP addresses of the remote machines.

You change the address PostgreSQL listens to:

We're specifically looking for a line that says “listen_addresses”. We're going to modify where PostgreSQL is listening from “localhost” to all (“*”).

You restart PostgresSQL for these changes to take place.

P.S: PostgreSQL server is listening on (default: 5432), must be added to the exception lists of all firewalls that are between the server and the web. Otherwise interactions with remote machines are consequently blocked and the database cannot be reached from outside.
Step 10: Configuring the Web Application Server
This step describes how to install Apache Tomcat, and to create instances for WebGIS and GeoServer application.
Installing Apache Tomcat:
First, you change to your home directory:

Then you use wget and paste in the link to download the Tomcat 8 archive. You find the latest version of Tomcat 8 at the Tomcat 8 Downloads page. At the time of writing, the latest version is 8.5.8.Under the Binary Distributions section, you find the Core list. Under this, you copy the link to the "tar.gz".Then you download the latest binary distribution to your home directory.

We're going to install Tomcat to the ~/tomcat directory. You create the directory, then extract the archive with these commands:
Next, you need to copy the scripts to tomcat/bin folder.

Creating Tomcat Instances: You have to create the directory for geoserver and webgis instance first.

Next, you change to tomcat directory and copy the copy conf, temp, webapps and logs to tomcat-instance/geoserver and tomcat-instance/webgis folder.


Configuring WebGIS Application Port: The Web-GIS application port is configured in ~/tomcat-instance/webgis/conf/server.xml.
You set the connector port to 8000.
You set the Server port to 8005.
You save the server.xml and exit.
Creating JNDI DataSource for Database Connection:
To declare a JNDI Datasource for PostgreSQL, you need to modify context.xml in ~/tomcat-instance/geoserver/conf and ~/tomcat-instance/webgis/conf folder. You add the following lines between the <context> </context> tag.

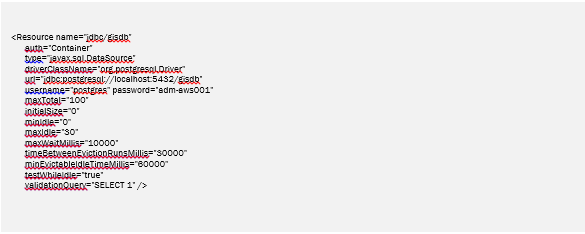
You save context.xml file and exit.
Step 11: Deploying Web-GIS Application
This section describes how to deploy Web-GIS application after you configure your Apache Tomcat application server. To deploy the WebGIS application:
- Copy the file “webgis.war” from the installer/apps folder to the <tomcat_root_path>/tomcat_instance/webgis/webapps/ directory.
P.S: Assume that tomcat_root_path is in /home/ubuntu

- Start Tomcat. This will extract the WAR file.

- After the application deployed, shutdown the server as below and delete the webgis.war file from <tomcat_path>\tomcat_instance\webgis\webapps\ directory. If you do not remove the WAR file after deployment, Tomcat redeploys the application each time the server starts.

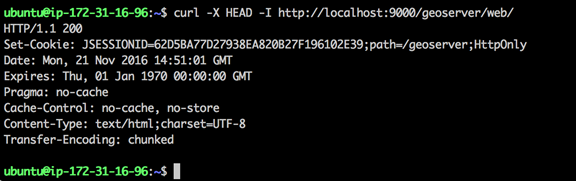
- Once Tomcat is up and running, you may run a health check to the WebGIS Page:

The output should be like the following figure shows:

Step 10: Setting the Web-GIS Application
This section describes how load the webgis database and configure the API URL’s of the front-end application. To load the webgis database into PostgreSQL execute this command.

To change the API URL’s of the front-end application, you need to edit the file “app.map.js”.

You need to change the value of the variable serverHost to the Public IP or DNS name of your server.You save the changes and restart WebGIS application.

Install GeoServer :
To insall the Geoserver, you need to download GeoServer Binary. You can find the latest version of GeoServer at the GeoServer Download page. At the time of writing, the latest version is 2.9.2. Under the Maintenance Distributions section, you click the version 2.9.2, then you copy the link of the "Web Archived".
First, you need to change to your home directory:

Then you use wget and you paste in link to download GeoServer 2.9.2.

We're going to install GeoServer to the ~/tomcat-instance/geoserver/webapps directory. If unzip is not installed, you may need to install using this command.

Step 11: Deploying GeoServer Application
To deploy the GeoServer application:
Unzip the file geoserver-2.9.2-war.zip
Then, copy geoserver.war to ~/tomcat-instance/geoserver/webapps directory.

Step 12: Setting the GeoServer Application
This step is about how to setup the GeoServer environment variables and Geoserver Data. You have to extract the geoserver_data.tgz into /home/ubuntu folder. This folder contains the geoserver settings and workspace for the layers.

You have to modify the following files and point the IP address of your server:
Example:
- ~/geoserver_data/workspaces/webgis/namespace.xml: <uri>http://192.168.1.41/geoserver</uri>
- ~/geoserver_data/workspaces/webgis/webgis/datastore.xml: <entry key="namespace">http://192.168.1.41/geoserver</entry>
The GeoServer Data Directory location and Tomcat environment options are set in ~/tomcat/bin/catalina.geoserver.sh.
The GeoServer Port is configured in ~/tomcat-instance/geoserver/conf/server.xml. You need to edit this file with the following setting. You set the connector to port 9000.

You set the Server port to 8006.

You set the AJP 1.3 Connector to port 8010.

You Save your changes and exit.
You may need to edit .bash_profile to set POSTGIS settings.

Then, you add the following lines to the end of the file.
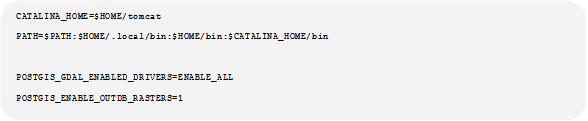
You save the changes, re-load the profile, and start GeoServer application.

Once GeoServer is up and running, you may run a health check to the Web Admin Page.

The right response should be as the following figure shows
Step 13: configuring Apache HTTP Server
This step is about how to install Apache HTTP server and configure reverse proxy.

Activating the Modules: Before configuring Apache,you need to enable the necessary modules that you will be using in the application. You run the following command to get a list of available Apache modules:

Once you are prompted with the choice of modules you desire, you can pass the below line listing the module names:

P.S: Some modules are likely to be enabled by default. Trying to enable them twice will just ensure that they are active.
Step 14: Modifying The Default Configuration
In this step, you will see how to modify the default configuration file 000-default.conf inside /etc/apache2/sites-enabled to set up "proxying" functionality. You run the following command to edit the default Apache virtual host using the vi text editor:

Here, you will define a proxy virtual host using mod_virtualhost and mod_proxy together. You copy-and-paste the below block of configuration, amending it to suit your needs:
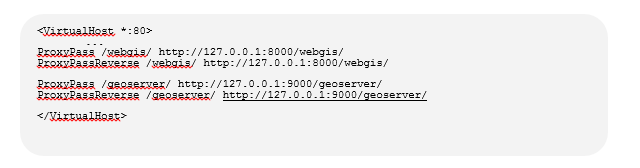
You save the changes.
Restarting Apache: you execute the following command to restart apache.

Congartulations! You can now access the WebGIS and GeoServer applications outside the network via browser with the following URL.
WebGIS Application: http://192.168.1.41:8000/webgis
GeoServer Application: http://192.168.1.41/geoserver/web/
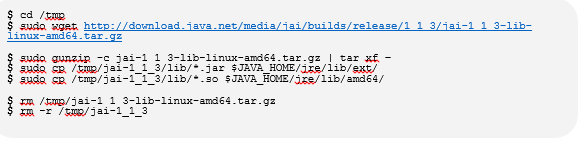
Install native JAI and ImageIO extensions
In this step, we are going to setup Java Advanced Imaging API (JAI) for improve the performance of all raster processing.
Preparation:
To avoid conflict in geoserver library, you install JAI 1.1.3, copy and paste the command below into the terminal window.
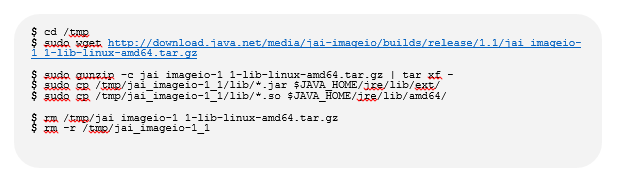
- You install JAI Image I/O
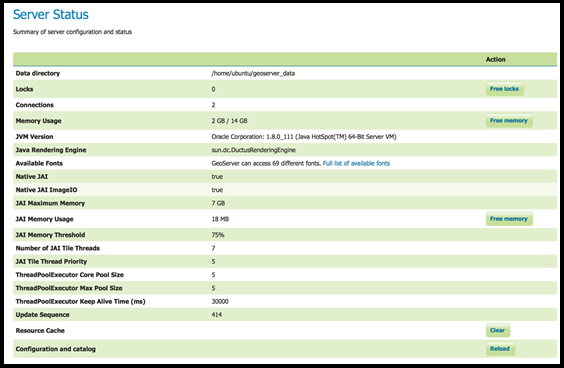
- To verify if JAI is successfully installed, you login to your GeoServer application and click “Server Status”.Native JAI and Native JAI ImageIO should be set to “true”.
Loading SLM data into PostGIS
PostGIS provides a “shp2pgsql” tool to convert ESRI shape files into SQL suitable for insertion into PostGIS/PostgreSQL database.For that, you nedd to prepare you directory.
Preparation:
You connect to your AWS Linux instance or localhost.
You extract "slm_data.tgz" located in the "installer/slm_data" directory.

Loading Data:
- You convert the shape file to SQL script.


- You load the SQL script to PostGIS database.


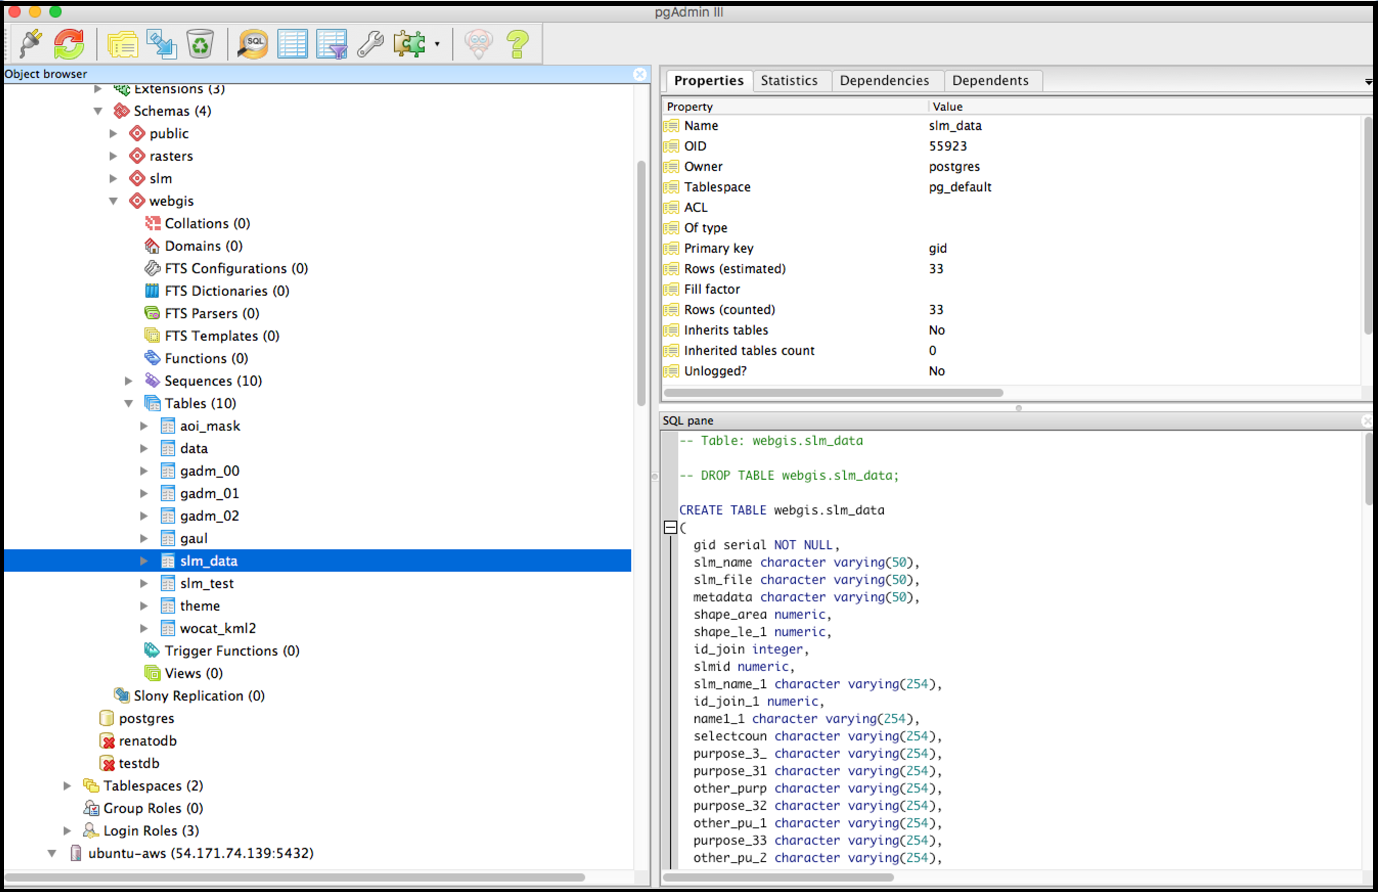
- Using PgAdmin tool you can verify the table “slm_data” is created in webgis schema.
- You just Finished. Next, you publish SLM to geoserver.
Publish SLM data to GeoServer
In this section, we are going to publish slm data into GeoServer.
- In your web browser, navigate to http://54.171.74.139/geoserver/
- Login to GeoServer. For this installation, the credentials are:
Username: admin
Password: adm-aws001
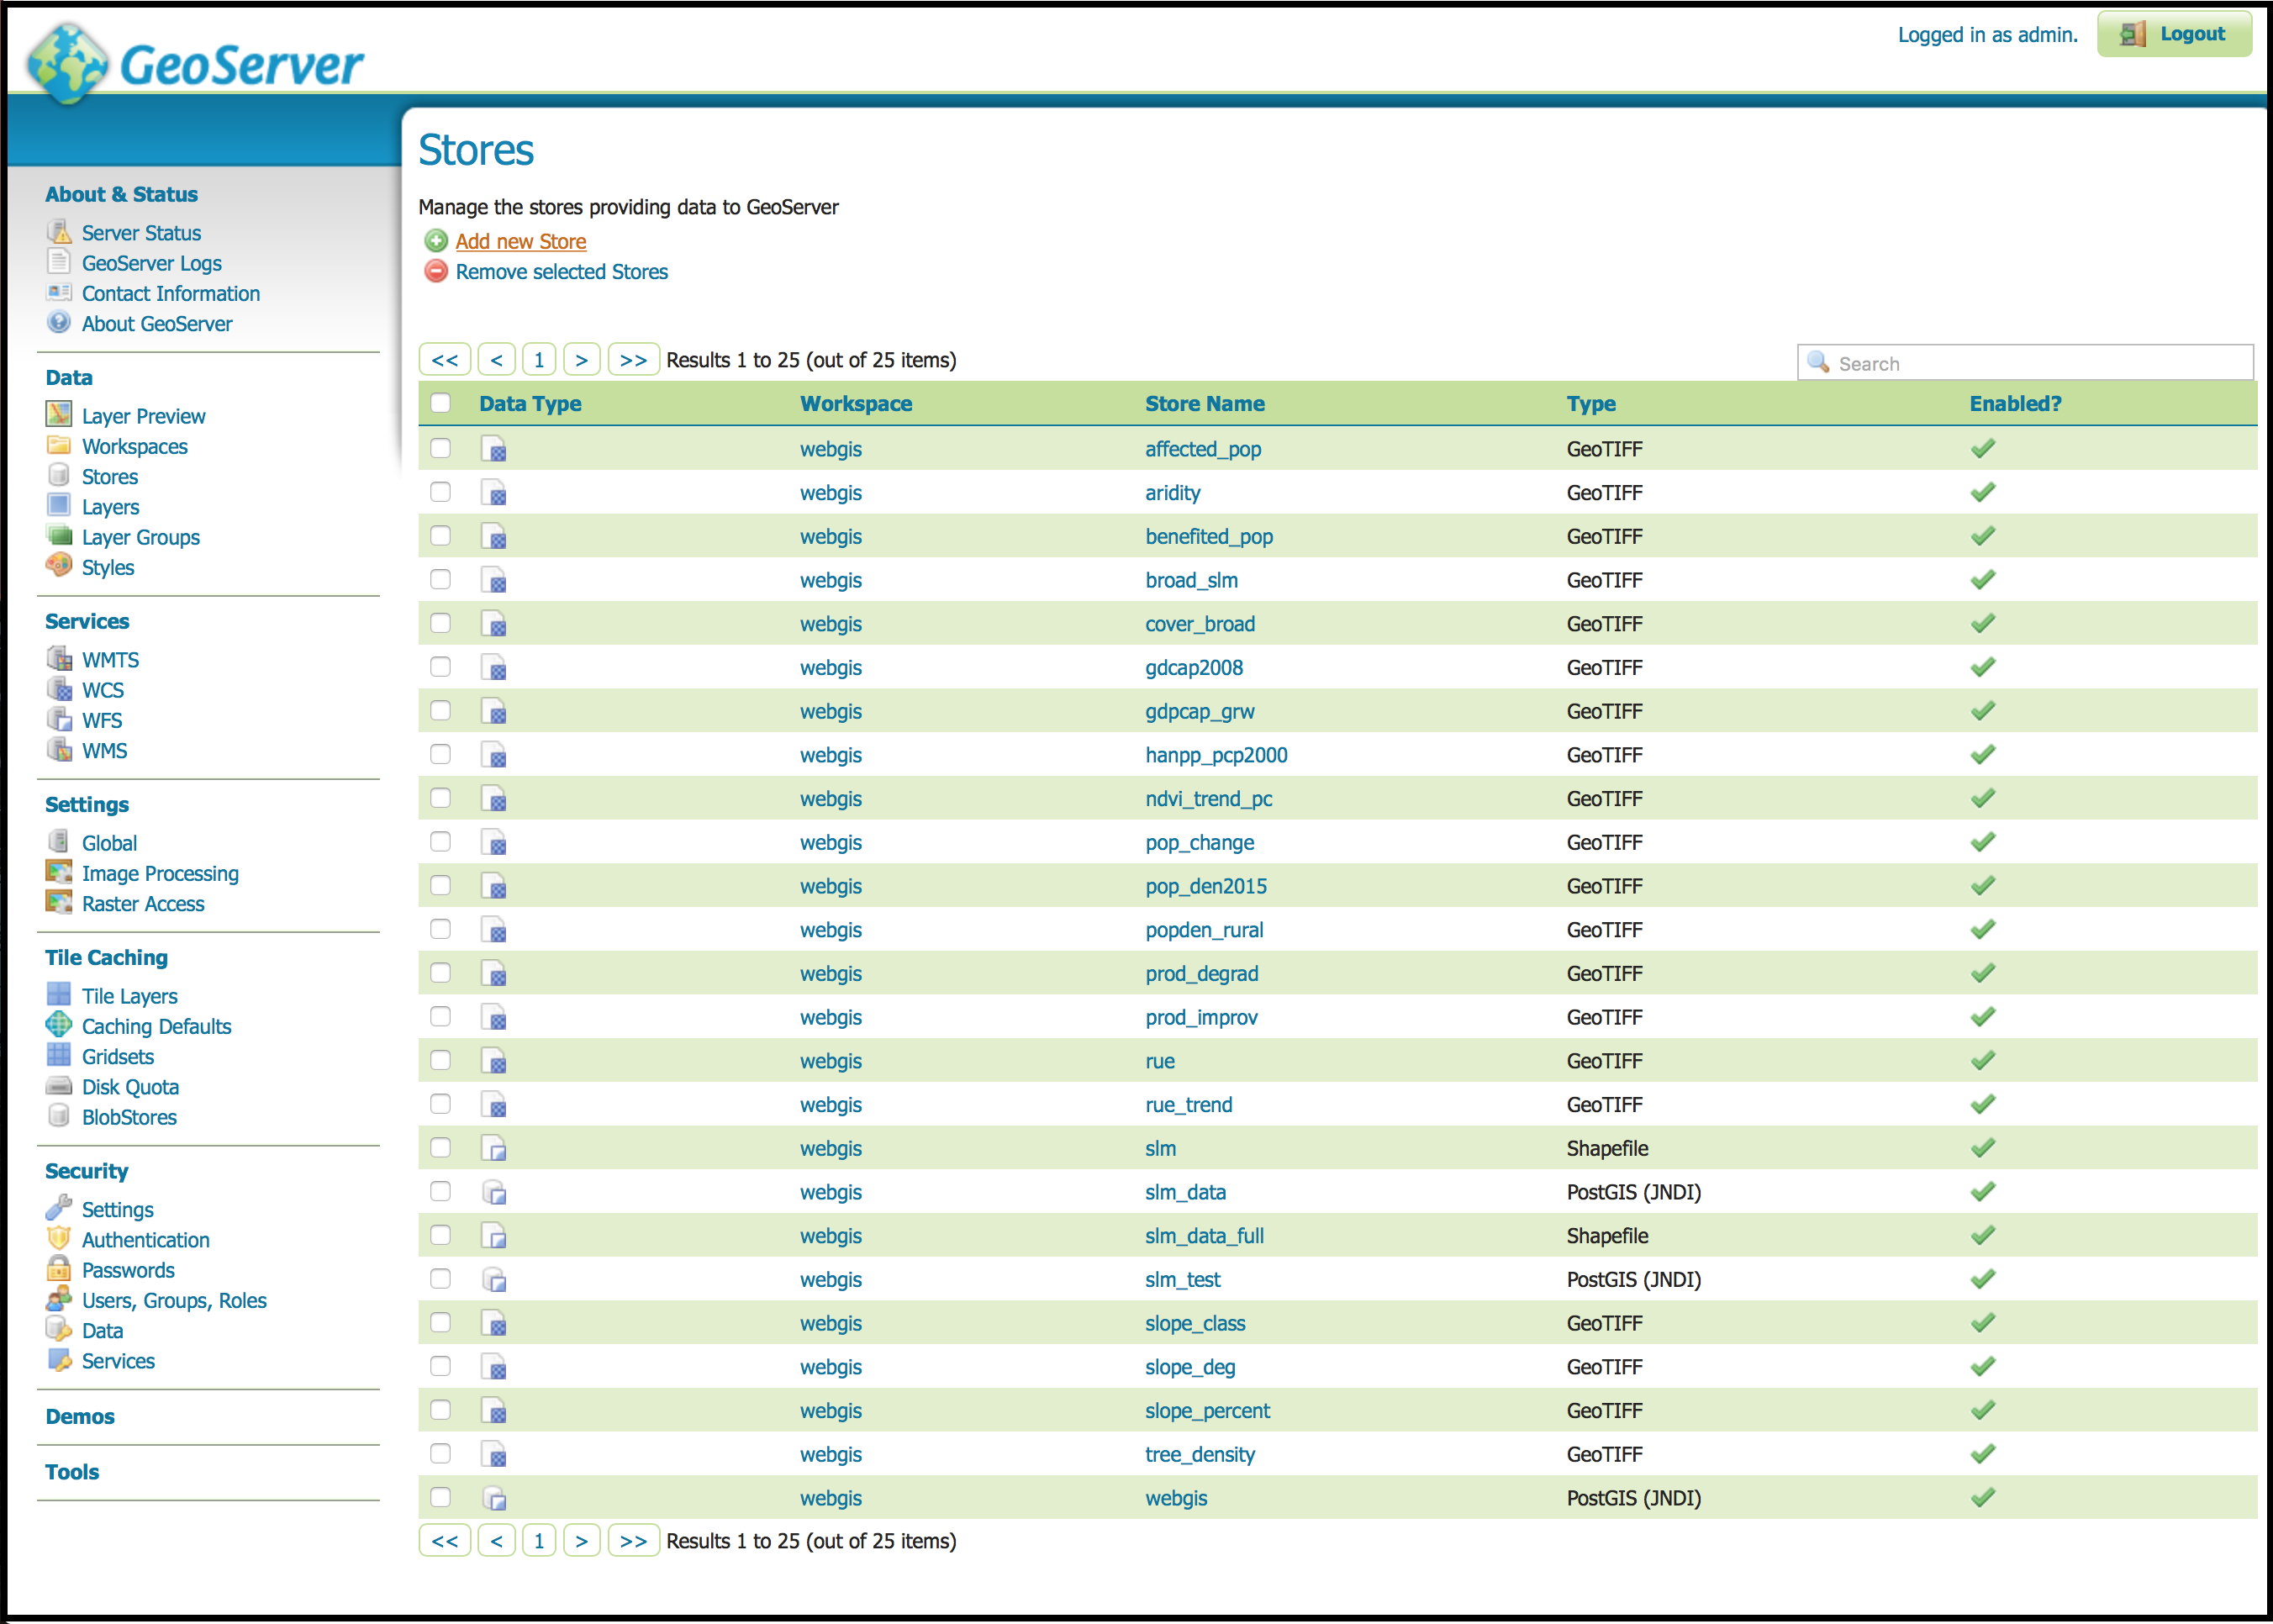
- You navigate to "Stores" ->Add "new Store"
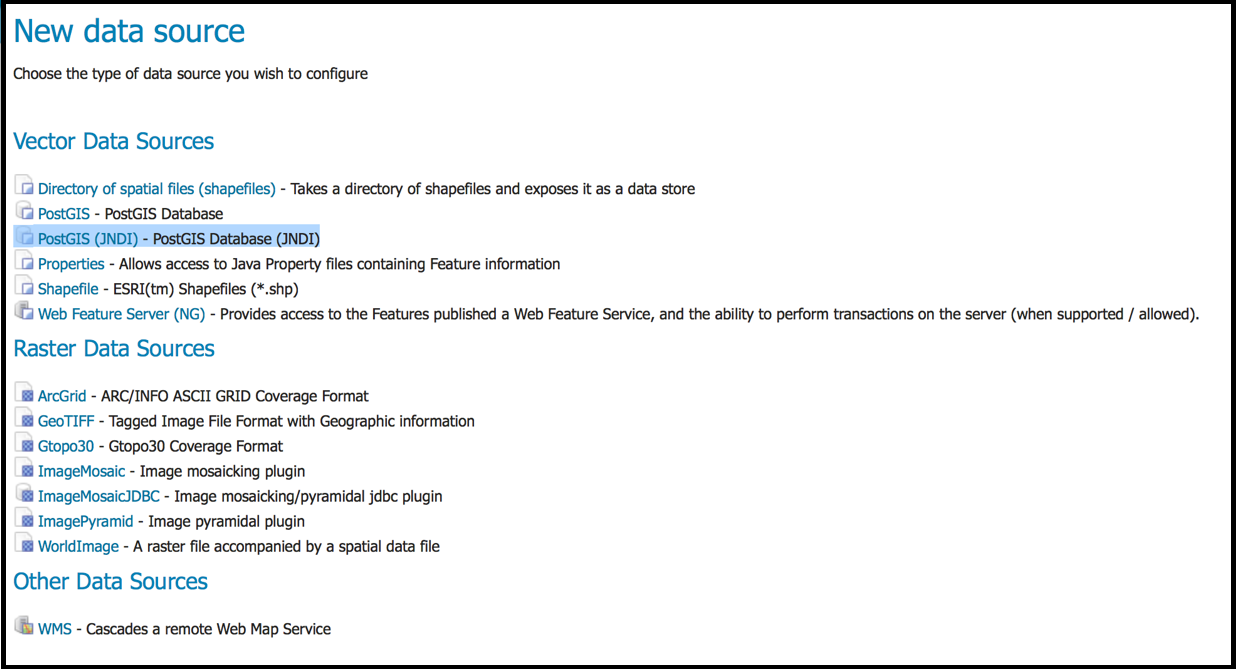
- You select “PostGIS (JNDI)”.
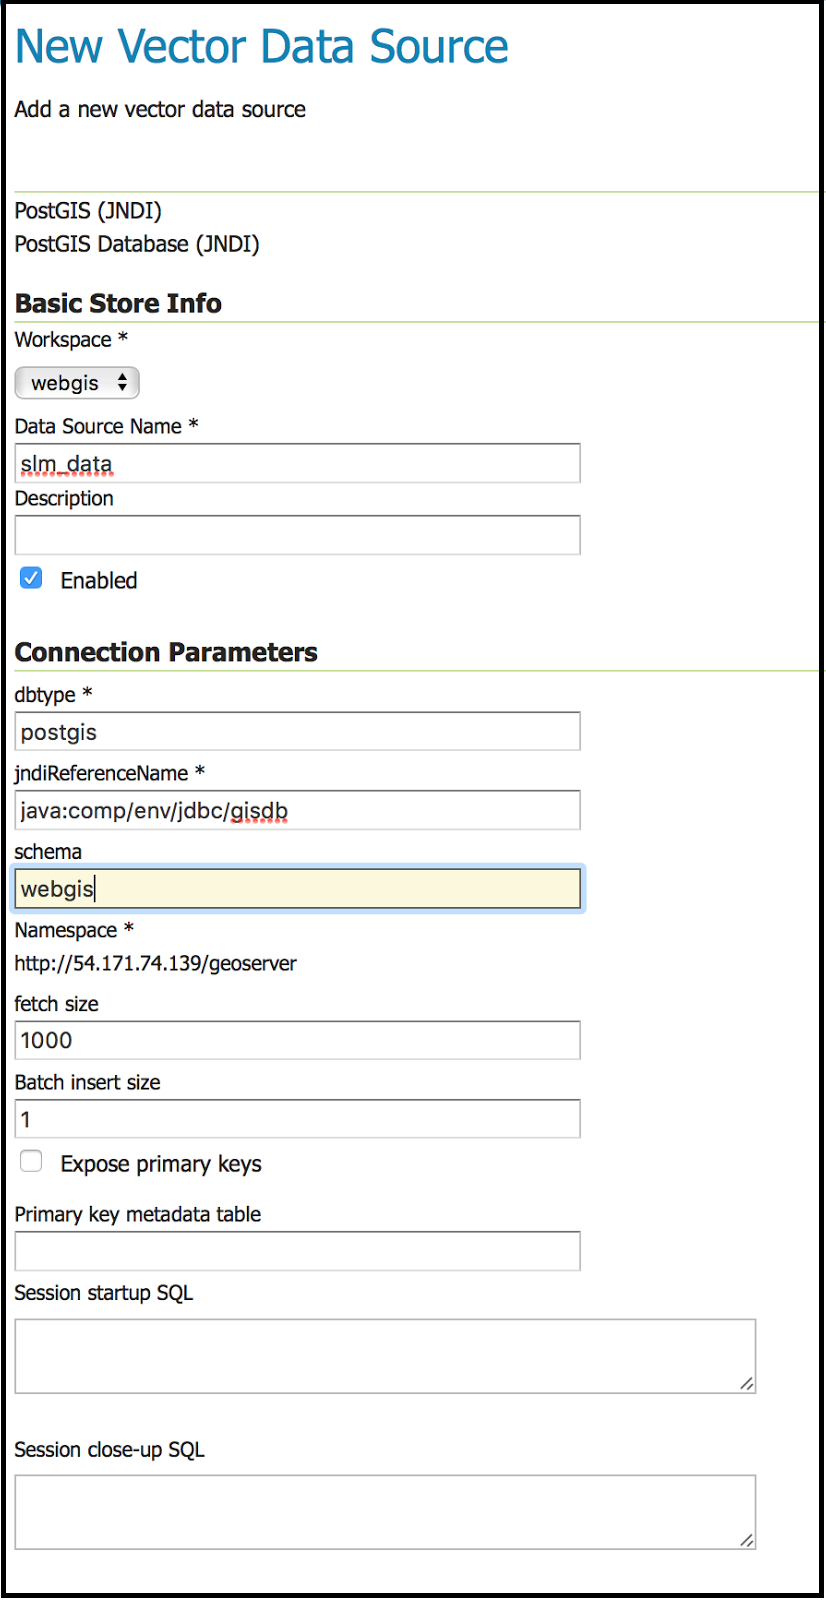
- You fill the following fields as shown in the following screenshot.
Basic Store Info: Data Source Name : slm_data
Connection Parameters
dbtype: postgis
jndiReferenceName: java:comp/env/jdbc/gisdb
- You click Save
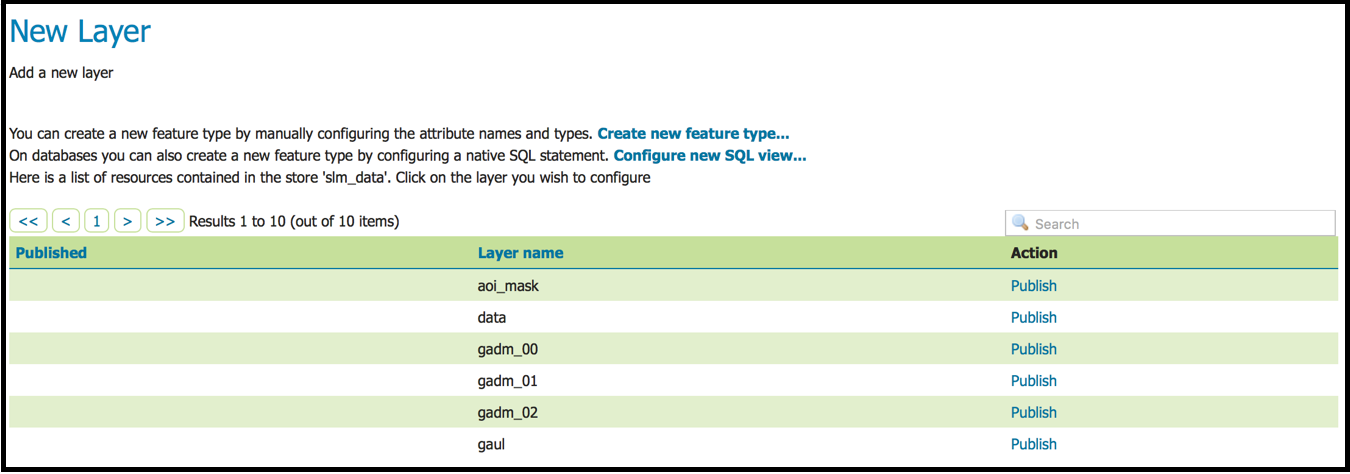
- You navigate on slm_data, in the action column click Publish.
- In the Data tab, you navigate to Bounding Box section. You click on the following link to calculate the bounding box:
Compute from data
Compute from native bounds
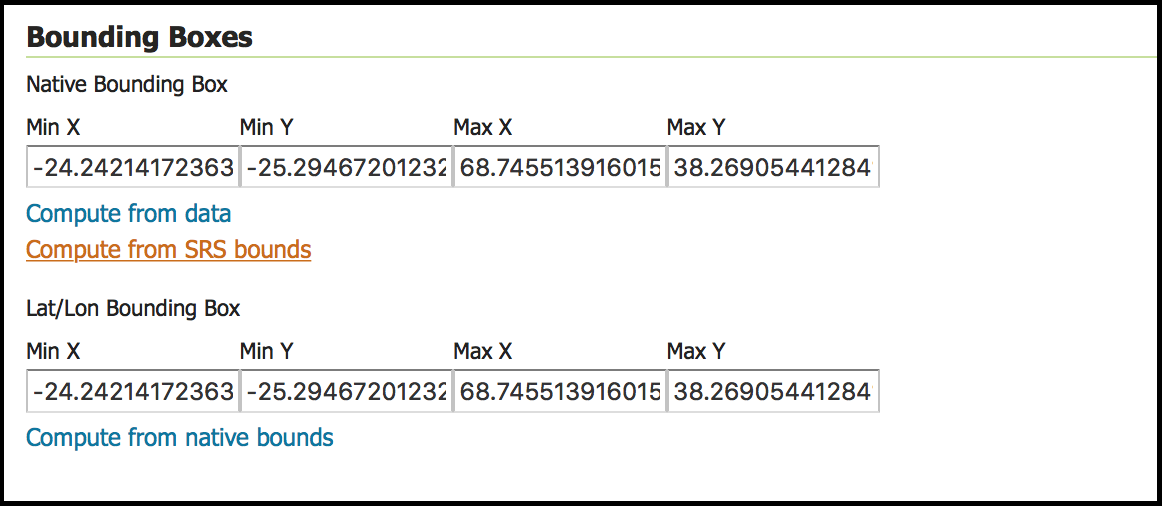
- You click "Save".
- To preview the "slm_data" layer, you navigate to Layer "Preview" in the menu (left side).
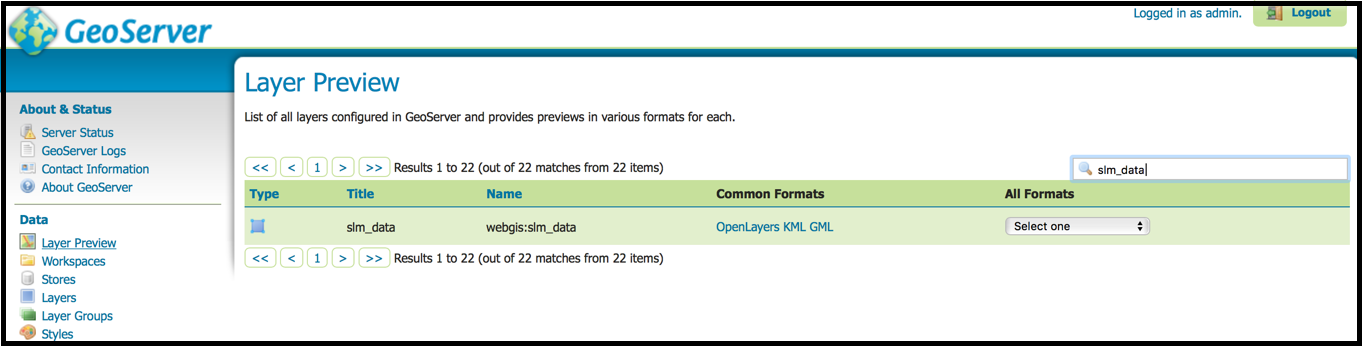
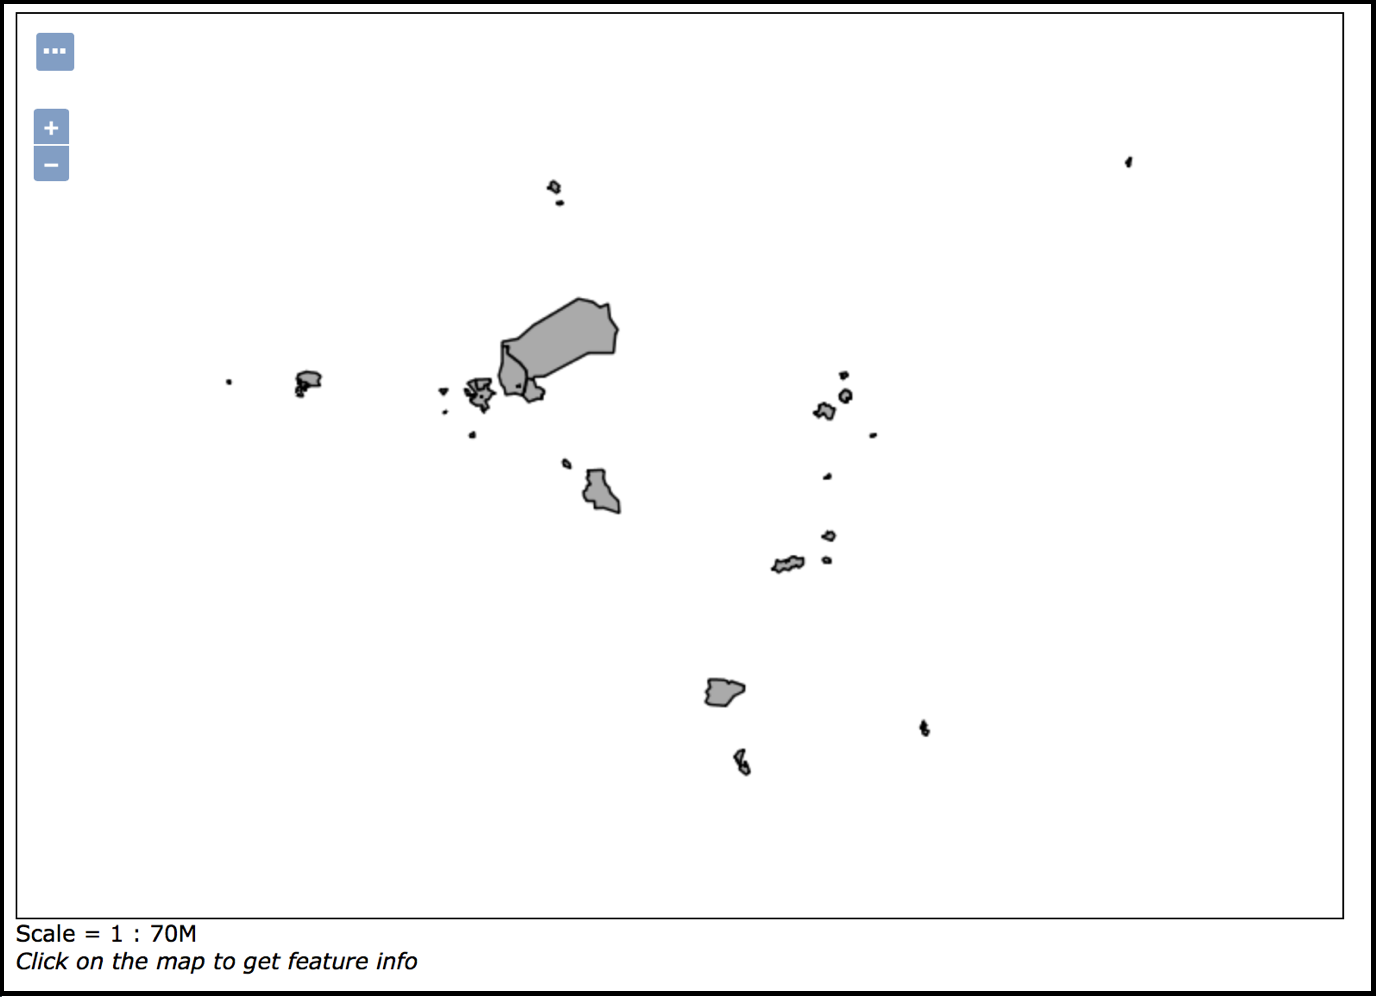
- You navigate to "slm_data" and in the "Column Format" column, you click "OpenLayers" to preview.
Loading Raster Data into PostGIS
PostGIS provides a “raster2pgsql” tool for converting raster data sources into database tables. This tool is wrapped into “load.tiff.sh” which will automate the process of conversion, renaming, and loading to database. This section describes how to use this tool to load a single or multiple raster files.
Preparation
- Connect to your Ubuntu Server.
- Verify the script “load.tif.sh” is exists by executing this command.

The output should be like the following figure shows:

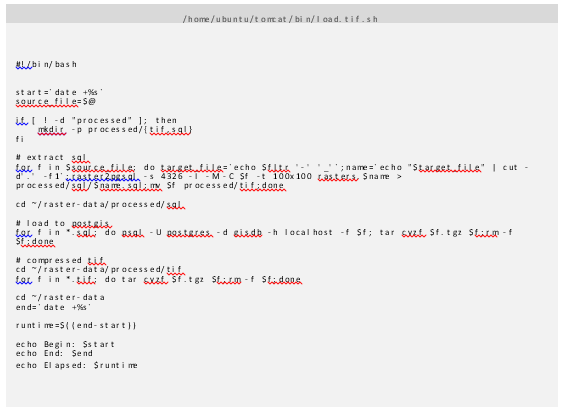
You run the following command to view the content of the loader script.

You select the raster files(s) you wish to load. You could simply copy them into a folder named “raster-data”.
Loading Data
You change the directory to the raster folder.

You execute the loader script by following this syntax.
- To load a single raster file:
load.tif.sh <RASTER_FILE>
for e.g. load.tif.sh cover-broad.tif

- To load multiple raster files:
load.tif.sh <RASTER_FILE1> <RASTER_FILE2…>
- To load using wildcard characters:
load.tif.sh <*.tif>
In this example, we load multiple rasters.
This will process all the rasters by extracting the data, load to database and compress them when completed. You will see same screenshot below when the process is completed.
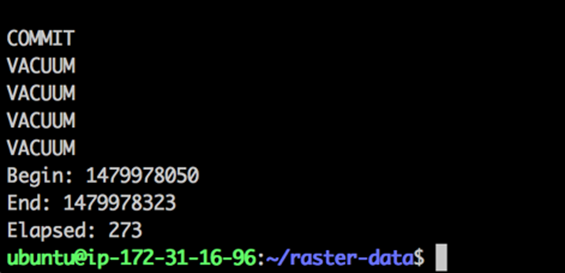
The raster files that has been processed are copied and compressed into processed folder. Below shows the directory structure.

If loaded successfully, new table are created in the rasters schema.
Publish Raster to GeoServer
In this section, we are going to publish raster data into GeoServer. You need first to prepare your files.
Preparation:
You create a tiff folder in the ~/geoserver_data workspace.

Next, you copy all the tiff files you want to publish into this folder. In this example, “tree-density.tif” is copied in ~/geoserver_data/tiff folder.
Rasters styles are stored in the installer->styles folder.
You proceed on the next section to publish the raster.
After preparation, in your web browser, you navigate to http://192.168.1.41/geoserver/web/
You login to GeoServer. For this installation, the credentials are:
Username: admin
Password: adm-aws001
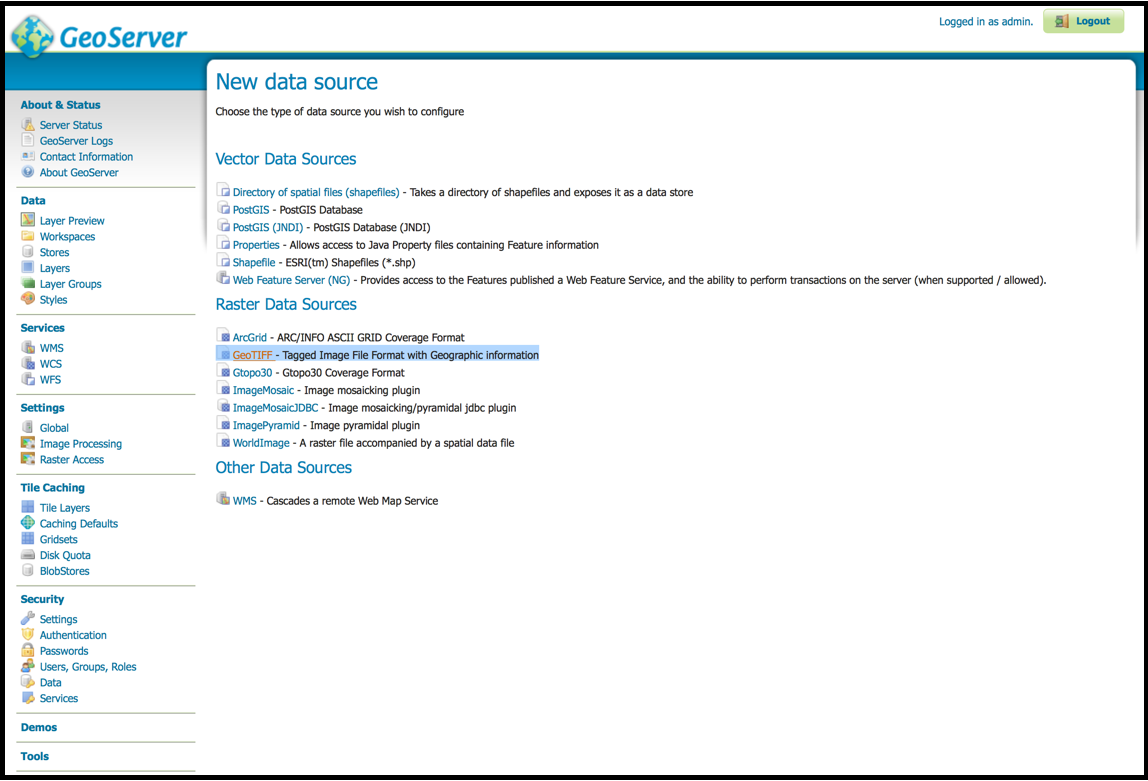
You navigate to Stores ->Add new Store.
You select “GeoTIFF”.
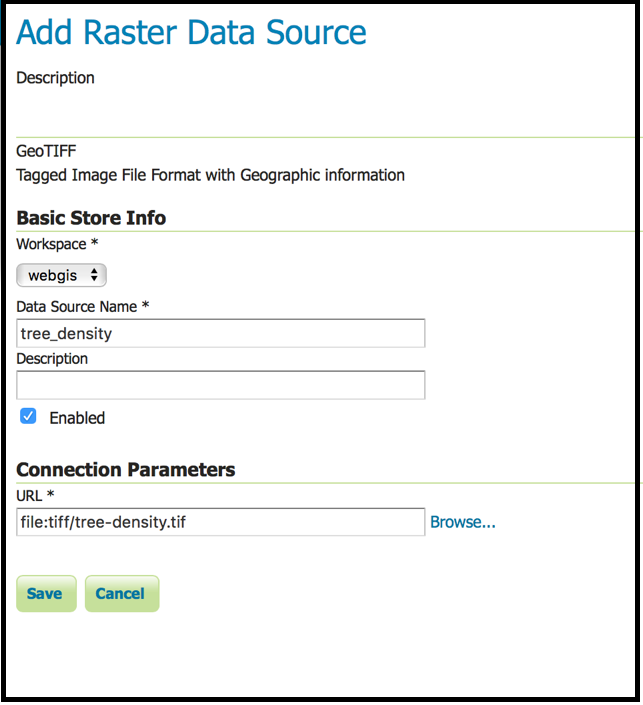
In the "Add Raster DataSource", you fill in basic store info and connection parameters.
Workspace: webgis
Data Source Name: tree_density
Description: tree_desnity
NOTE: In the data source name, please use “_” (underscore) instead of “-” (hyphen) to match the table name in postgis.
For "Connection Parameters", you click Browse and navigate to “tiff” folder.

You select the “tree-density.tiff” as shown below screenshot.
You click Save. If no errors are returned, you will be redirected to New Layer page in order to configure the tree_density layer. Now, that the store is loaded.
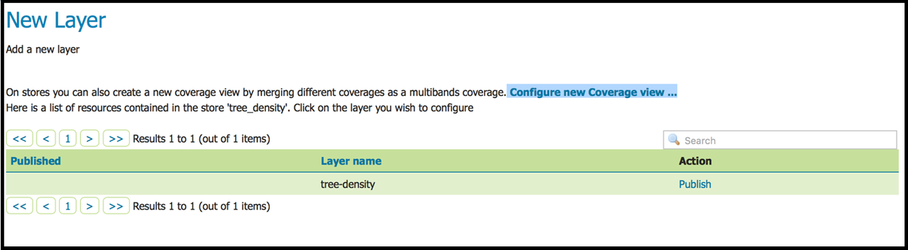
You click on Configure new Coverage View….
You change the name to “tree_density”. Click Add button to add Composing coverages/bands to Output bands to be created.
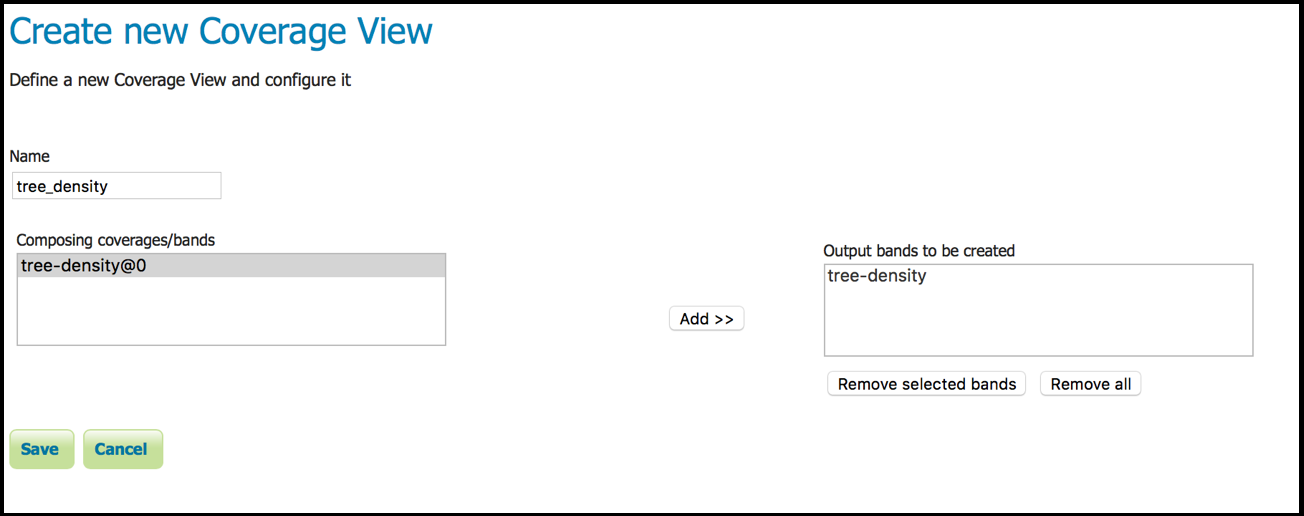
You click Save.
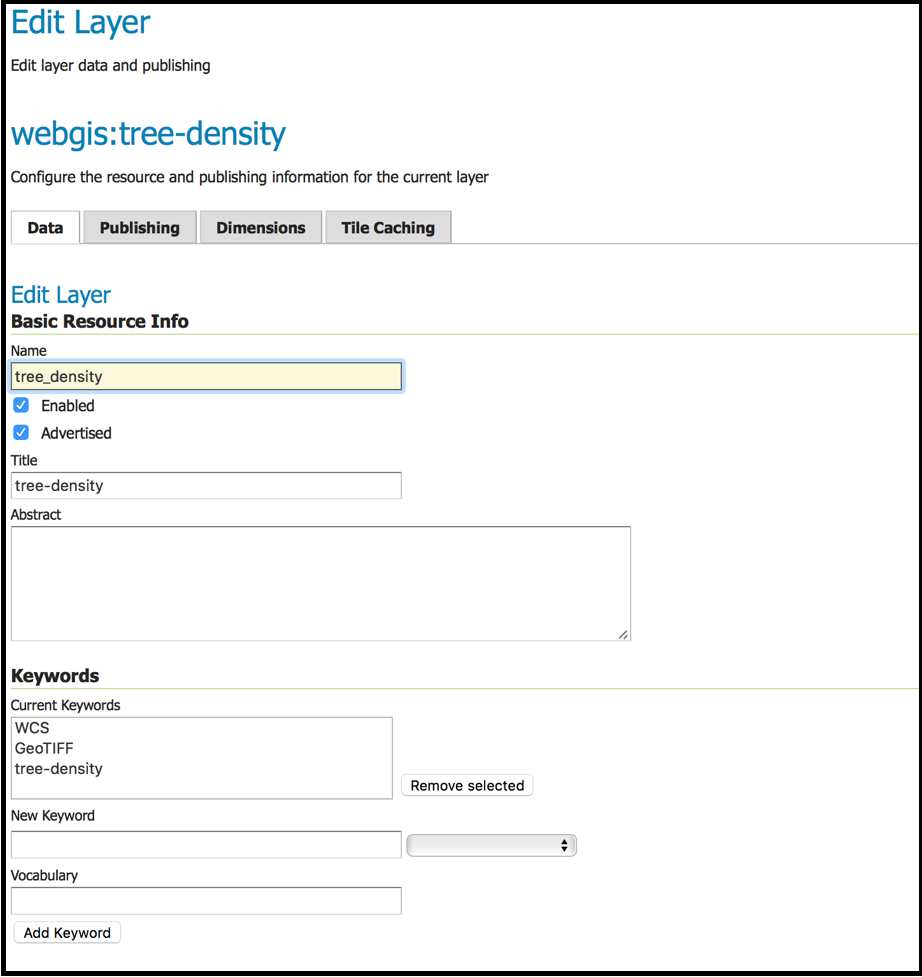
You edit the Layer page defines the data and publishing parameters for a layer. Forthat, you process in 5 steps:
- You enter a short title and an abstract for the tree_density layer.
P.S: In the Name field, please use “_” (underscore) instead of “-” (hyphen) to match the table name in postgis.
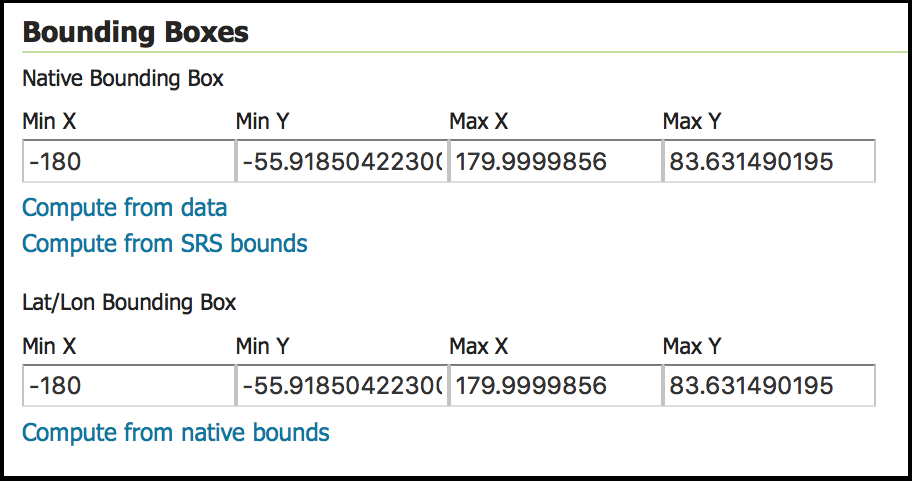
You generate the layer’s bounding boxes by clicking the Compute form data and then Compute from native bounds links.
- You click the Publishing tab at the top of the page.
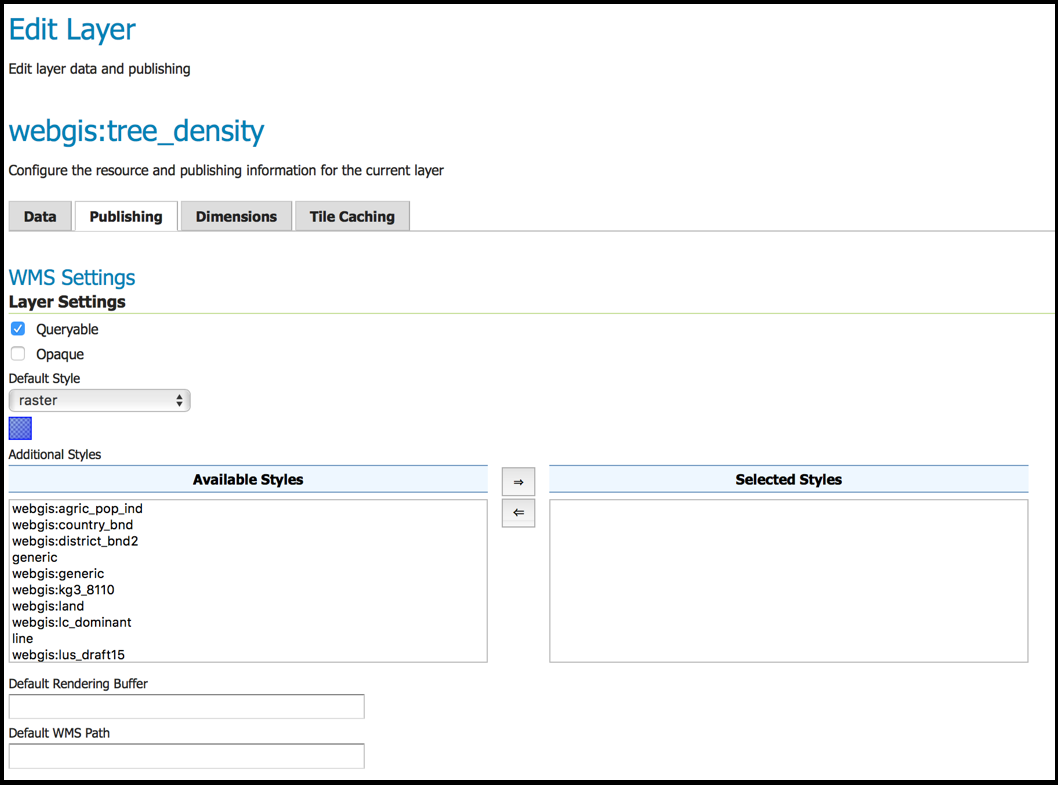
- In the WMS Settings, you tick Queryable and you leave the default style to raster. Next section, we are going to create a style for this layer
- You finalize the layer configuration by scrolling to the bottom of the page and clicking Save.
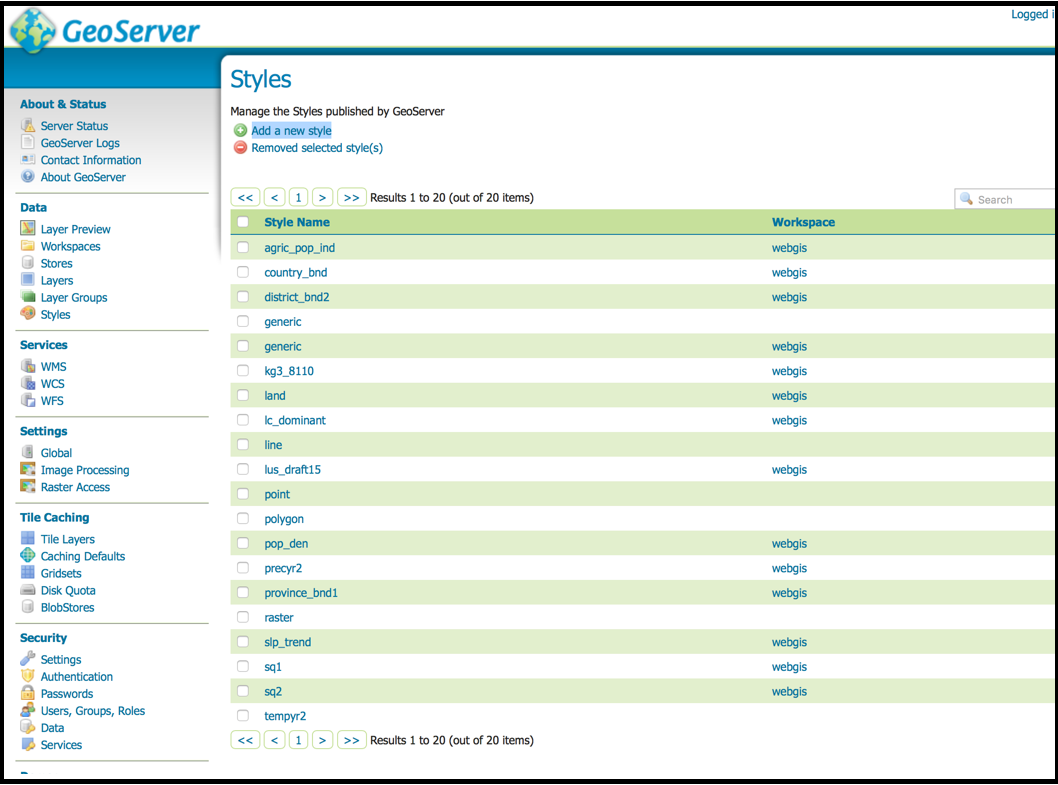
You create SLD Style
You navigate to "Styles" → "Add a new style".
- You scroll to the bottom and click “Choose File”.
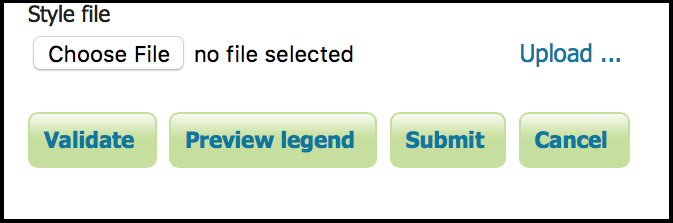
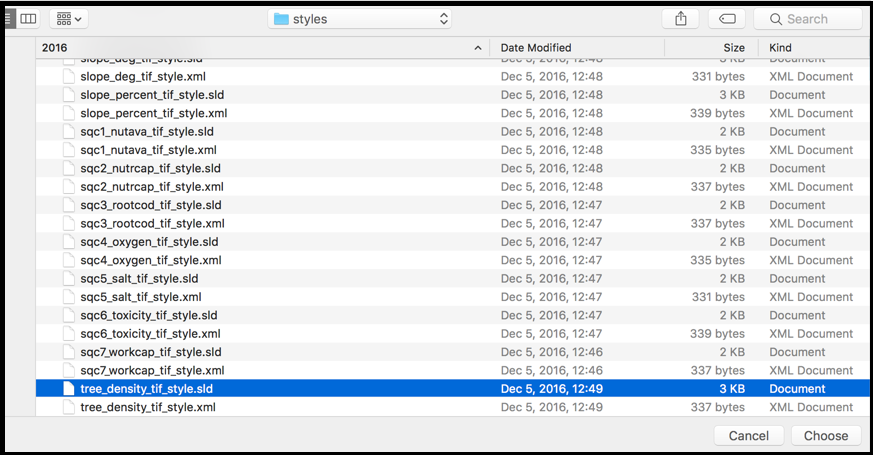
- You navigate to “Installer->styles” folder and locate “tree_density_tif_style” and click choose.
- You click “Upload…” to load the styles into the editor and set the workspace to “webgis”.
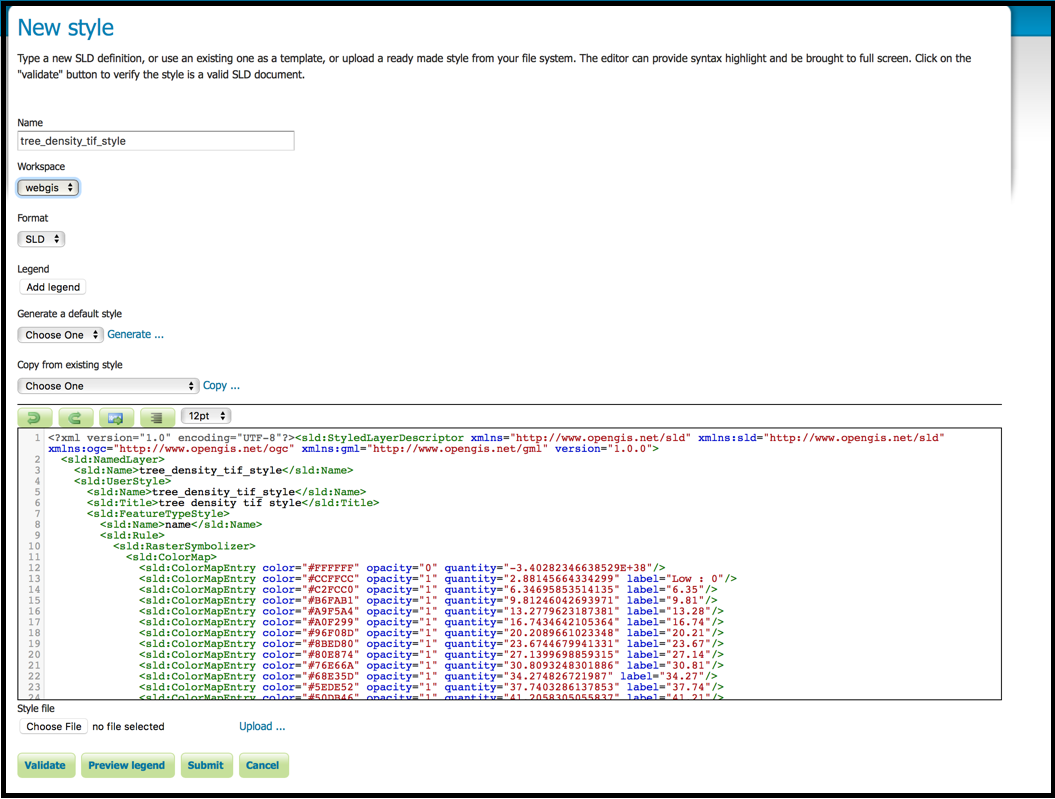
- You click "Validate", to check the style for errors.
- If no error, you click "Submit".
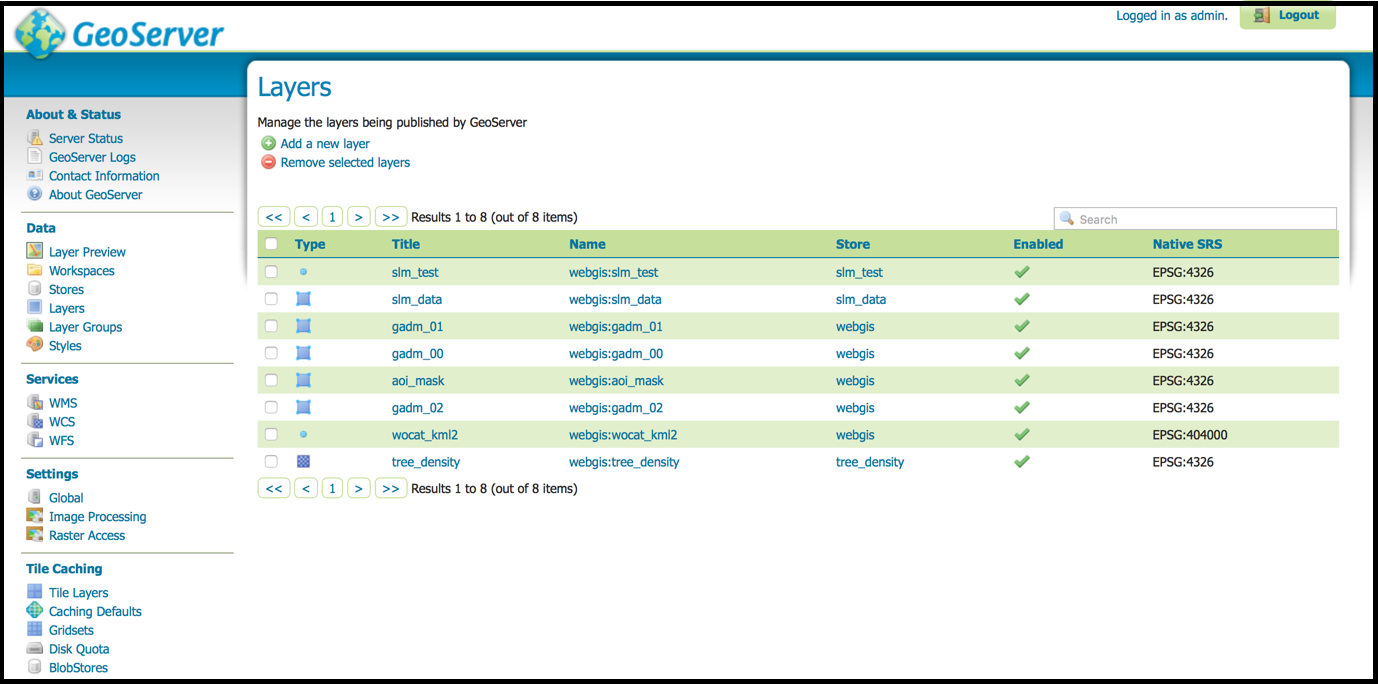
- Next, you navigate to Layers.
- In the Title column, you click "tree_density layer".
- You click Publishing tab.
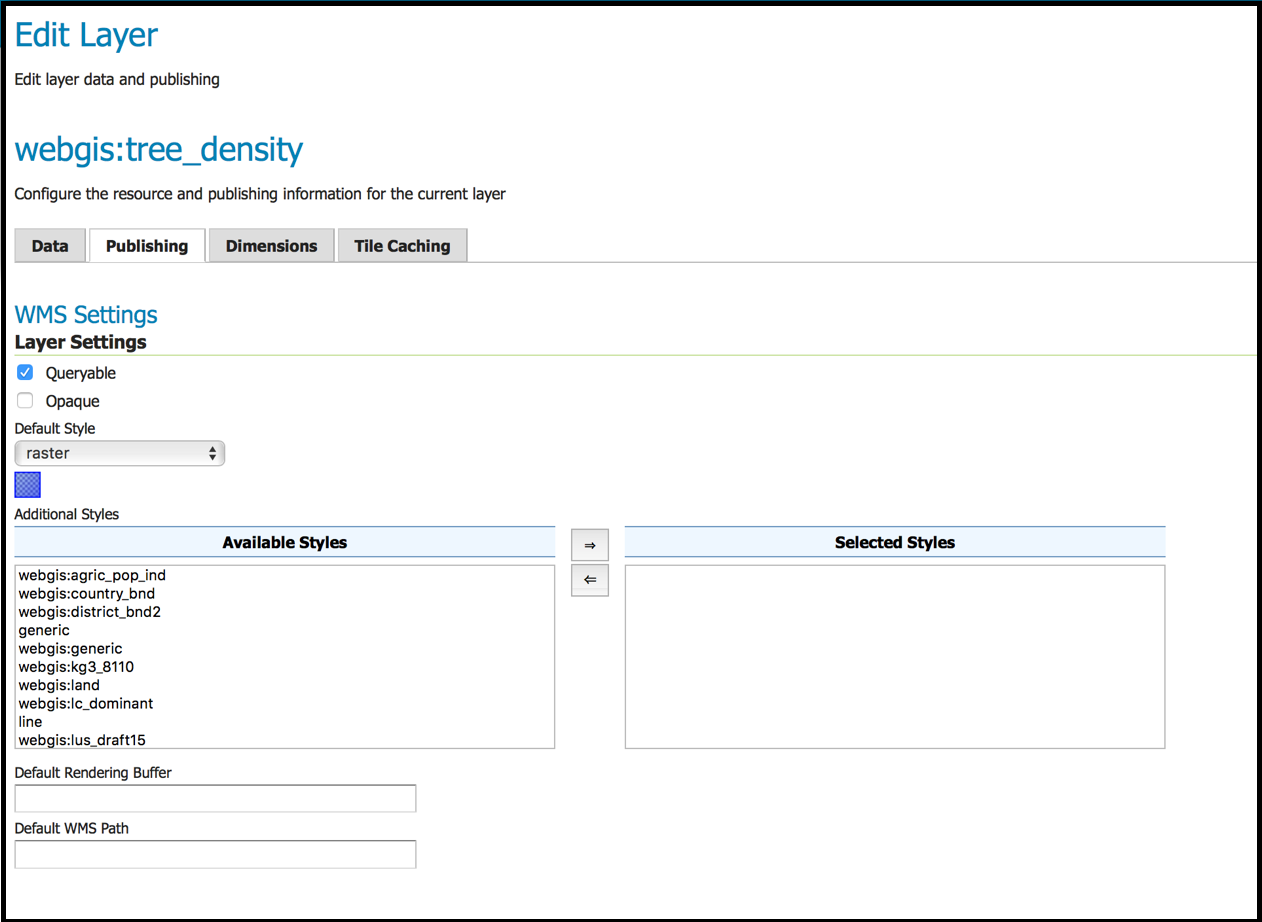
- In the Default Style, select the style name “webgis:tree_density_tif_style” and click Save.
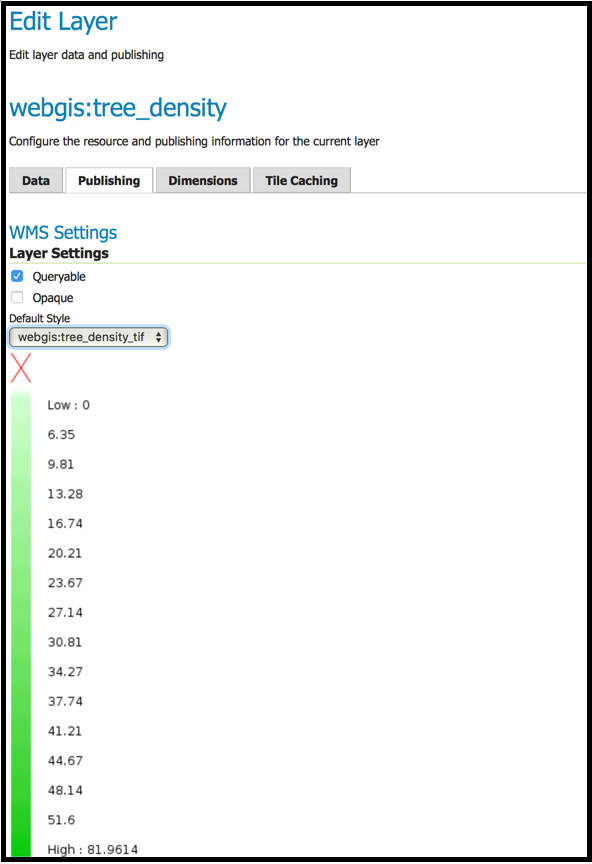
- You preview the Layer.
In order to verify that the tree_density layer is published correctly, you can preview the layer by:
Clicking on the Layer "Preview" in the left side menu.
In the Layer "Preview" screen, you find tree_density layer.
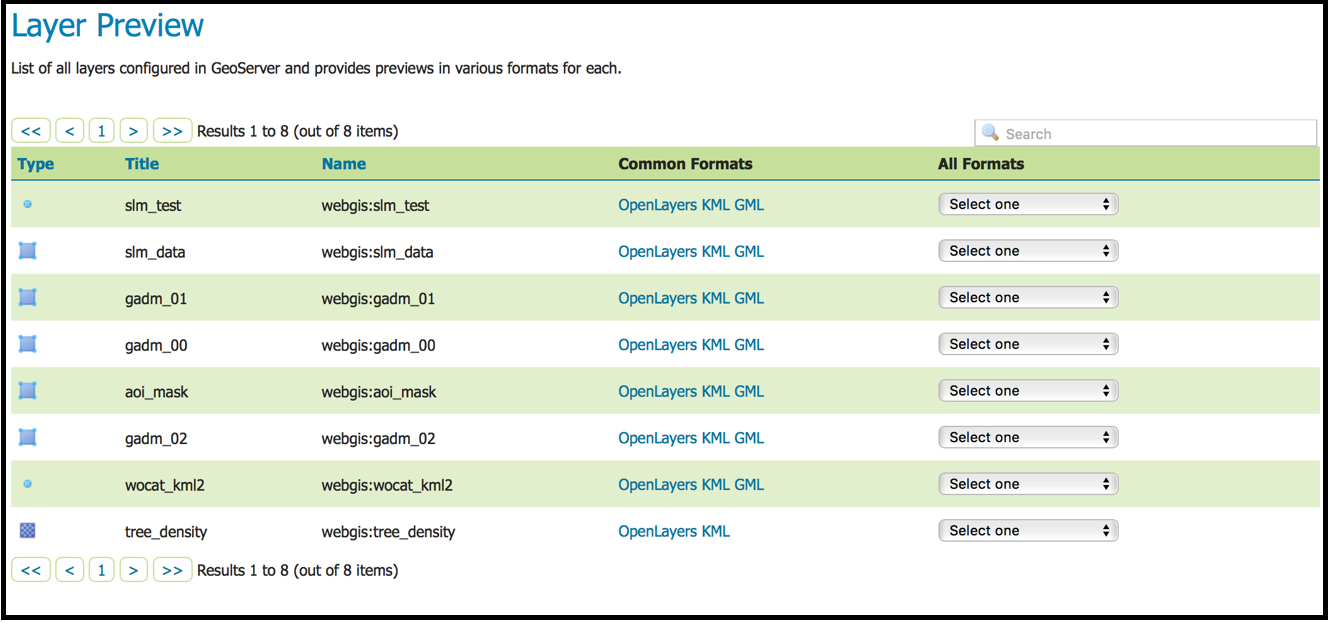
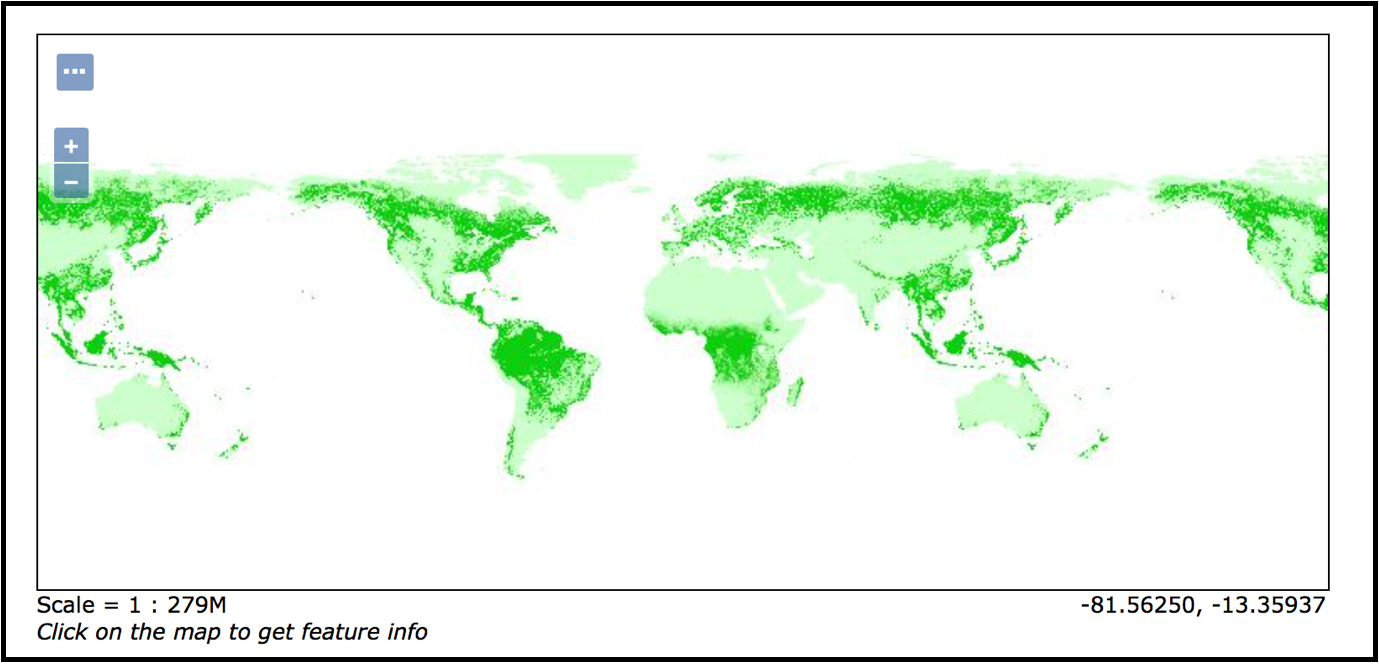
You click the "OpenLayers" link in the Common Formats column. An "OpenLayers" map will load in a new tab and display the raster.
- If you wish to publish another raster, you have to repeat the whole process.
Conceptual Infrastructure Design
Web-GIS is using the following operating system, and software versions:
- OS: Amazon Linux AMI
- Tomcat: 8.x
- HTML5/Javascript
- Spring: 4.3.x
- Java REST API:
- PostgreSQL: 9.4
- PostGIS: 2.2
- GeoServer: 2.9.1
- ArcGIS Desktop: 10.3
- ArcGIS Server: 10.3
- Leaftlet API: 0.7.7
- Openlayers: 3.18.2
- ArcGIS Javascript API: 3.1
- SmartAdmin (User Interface): 1.8.2
- Bootstrap v3.3.6
Hardware Detailed Design
WebGIS Hardware specification (minimal requirements) of the application can be found below.
- Amazon EC2 Instance / Model T2 Large
- Intel Xeon Processors with Turbo up to 3.3GHz
- 2 CPU
- 8 GB RAM
- 15 GB SSD Storage
The following figure shows the hardware implementation of the WebGIS application:
Figure 14 : Hardware and Operation System implementation
WebGIS Operating Environment
The WebGIS operating environment was developed and deployed on Amazon EC2 Server Linux system and is capable of working on any other system that support JAVA and the libraries that are being used.
The organization of the system displayed by a chart depicting components and their interrelationships is shown below:
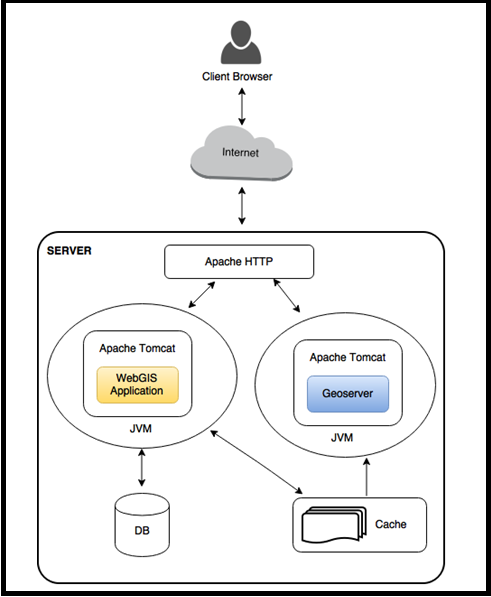
Figure 15: Web-GIS Operating Environment